Quick Start — For the Impatient and Excited
Adding outfits to your Wardrobe:
- Wear the Wardrobe HUD
-
Optionally: Pose (anywhere — or on the Wardrobe pose stand).
Click the arrows on the
 button to switch between poses.
-
Click the snapshot button
 .
It will tell you how to take, tag, and upload the snapshot.
.
It will tell you how to take, tag, and upload the snapshot.
There are a number of alternate ways (sending snapshots by e-mail, uploading existing textures, importing from the SL Marketplace) to add a snapshot to your Wardrobe. Have a look at the manual to find out. - Stop posing

- Open the Wardrobe web page

- Drag snapshot(s) you saved to your Wardrobe web page and click "Import"
Wearing an outfit in your Wardrobe:
- Open the Wardrobe web page or the rezzed closet and choose the outfit you want to wear
- On the web page, click the icon
Note that certain prerequisites must be met in order for you to be able to wear outfits from the website or the closet. Read this to find out how to prepare your inventory and viewer.
The HUD
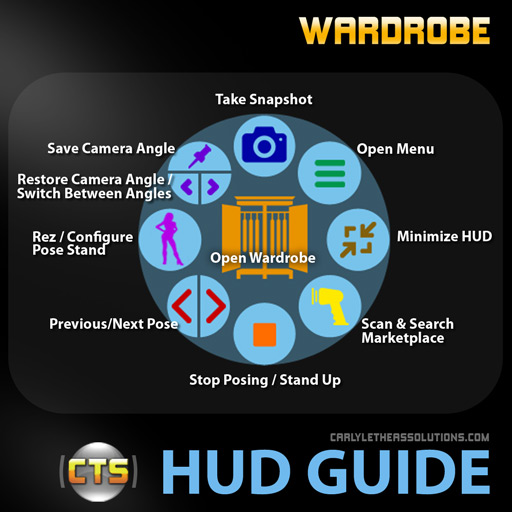
The Wardrobe HUD is one of the essential parts of Wardrobe. It is the gateway to online Wardrobe page and is also a posing HUD. Wear it. By default, it will attach to the bottom HUD attachment point. You can attach it to any HUD attachment point.
The Web Page
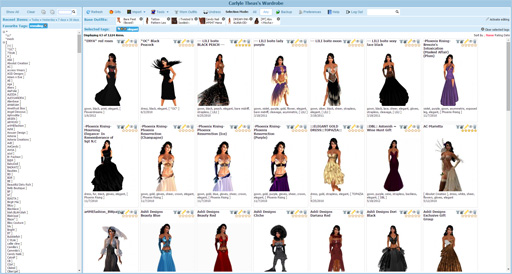
Your personal Wardrobe web page displays your outfits. Filter your outfits by tags: click a tag name in the left bar and only the outfits matching the tag will be displayed. Rate your outfits. Edit and delete items.
You have already made snapshots of outfits before you had Wardrobe? Did the designer provide you with pictures of the outfit? No problem, on the website you can upload existing (full-perm) textures: simply drag the texture onto your HUD and follow the instructions to complete the uploading process, or on the web page, click Import > Import Texture (you'll need to get hold of the texture's UUID, which you can find and copy by right-clicking it in your SL inventory and selecting "Copy Asset UUID"). You can also upload pictures directly from your harddrive.
Note that the image size is limited to 480x480 pixels. If your image is larger, it will be resized. Thumbnails have a resolution of 200x200 pixels.
The Closet
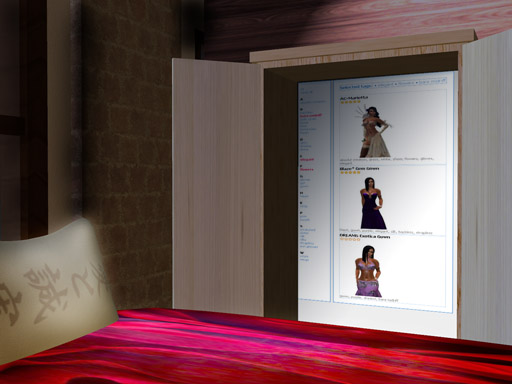
Wardrobe also comes with a mesh closet that you can rez in your bedroom. When you open its doors it will display the Wardrobe web page inside. You can browse your outfits or show them to your friends.
It works exactly as the usual Wardrobe web page, albeit not providing all the tools you have access to on the web page.
You can choose from a set of closet textures either on your HUD (Menu > Setup > Closet Styles) or on your Wardrobe web page (Tools > Configure Closet > Closet Styles). In both cases, you'll need to stand near a rezzed closet to change the style.
Rezzing the closet is optional. You don't need it in order to use Wardrobe.
Special thanks to Karthikeyan Engineer, the owner of MADRAS, for designing and creating the mesh closet.
The Pose Stand
Using your HUD, you can rez a pose stand anywhere you can rez objects. Just click your HUD's ![]() button and a new pose stand will be rezzed.
The Wardrobe pose stand features a backdrop that will open when you
stand on the pose stand. You can select backdrop colors or textures on your HUD, or choose to hide it.
You can also configure the posestand from your Wardrobe web page: Tools > Posestand Backdrops. This will be easier if you want to use a backdrop texture
since the web page will display a catalogue of available backdrops to choose from (and you can even add your own!).
button and a new pose stand will be rezzed.
The Wardrobe pose stand features a backdrop that will open when you
stand on the pose stand. You can select backdrop colors or textures on your HUD, or choose to hide it.
You can also configure the posestand from your Wardrobe web page: Tools > Posestand Backdrops. This will be easier if you want to use a backdrop texture
since the web page will display a catalogue of available backdrops to choose from (and you can even add your own!).
Use the usual pose buttons on the HUD to switch between poses or stop posing.
This way, the Wardrobe pose stand becomes a handy miniature photo studio.