Posing and Taking Snapshots of Your Outfits
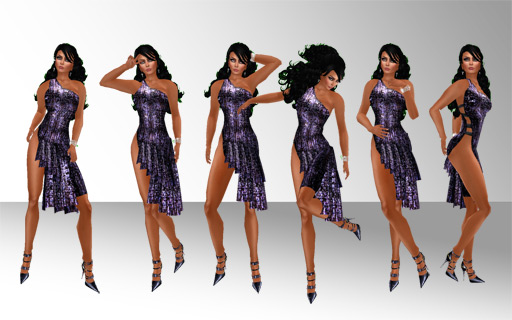
One of the main tasks when you use Wardrobe will be taking snapshots of your outfits. To take a picture that emphasizes your outfit, you may want to strike a pose and also choose a background for the picture that accentuates the outfit.
Using the Wardrobe pose stand, both these goals can be accomplished. If you don't or can't use the pose stand, the HUD also provides you with a simple posing facility.
This page briefly explains how to use both the HUD and the pose stand for posing, and gives details on how to actually take a snapshot and upload it into your Wardrobe.
Posing
Using the HUD
Clicking the arrows on the ![]() button will start posing mode (if you aren't posing already) or
switch between poses. When posing, the camera will be automatically focused on you.
Click the
button will start posing mode (if you aren't posing already) or
switch between poses. When posing, the camera will be automatically focused on you.
Click the ![]() button when you are done posing. This will also take your camera back to the normal view.
button when you are done posing. This will also take your camera back to the normal view.
Using the pose stand
Click the ![]() button. This will rez a new pose stand. Sit on it to start posing.
As soon as you sit on it, the pose stand will unfold its backdrop to make it easy for you to take pictures without distracting background details —
you want the focus of your picture to be on your outfits. You can change the backdrop's color or texture or hide it
by clicking the pose stand button
button. This will rez a new pose stand. Sit on it to start posing.
As soon as you sit on it, the pose stand will unfold its backdrop to make it easy for you to take pictures without distracting background details —
you want the focus of your picture to be on your outfits. You can change the backdrop's color or texture or hide it
by clicking the pose stand button ![]() again.
again.
To switch between poses, use the arrows on the ![]() button as in HUD mode.
button as in HUD mode.
Click here for more comprehensive information about the pose stand.
Built-in poses and adding more poses
Wardrobe comes with a set of pre-installed poses. If you wish, you can add your own by opening the Wardrobe HUD's inventory (right click the HUD and go to the "Content" tab) and dragging your poses from your inventory into it. If you want to add poses that aren't full perm, you have to rez the HUD to be able to do that: detach it, drop it to the ground from your inventory, open the Wardrobe's inventory as described above, and take it back into your inventory after you're done.
When rezzing a pose stand, you will be asked which set of poses you want to install into the pose stand. Please make sure to click the respective button so the poses will be installed. If you neglect to install the poses, you'll receive an error once you're trying to pose on the stand.
Please note that only poses with the "copy" permission will be installed in the pose stand.
Taking Snapshots
Method I: Send by e-mail
- Click your viewer's Snapshot button:

- The Snapshot window will open. Select "Email", choose the size in the "Settings" tab and also make sure that "capture HUDs" checkbox in the advanced settings is not ticked.
- Enter the Wardrobe email address (you'll find it in a notecard that came with the Wardrobe package).
- Copy the name of the outfit into the "Subject" field.
- Enter the tags in the "Message" field, separated by commas.
- Optionally, add a remark on a second line in the "Message" field.
- Click the "Send" button. The item will be uploaded into your Wardrobe.
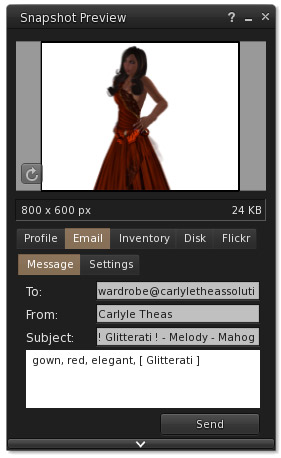
To speed up sending and processing, select a resolution of 640x480 pixels, which is totally sufficient, since the Wardrobe uses images with 480x480 (enlarged) and 200x200 (thumbnail) resolutions.
If you want to see your newly submitted item, open your Wardrobe web page and click the "Show All" button or click the clock in the search field, and then "Today". If the web page is already open, click the "Refresh" button.
Method II: Save to disk and upload
- Click the HUD's snapshot button
 .
. -
The HUD will instruct you to enter
- Either a URL of a Marketplace item or the outfit's name (the name of the folder containing your outfit),
- Tags (separated by commas) describing your outfit so you can find it again easily (e.g., gown, purple, low cut, elegant),
- Remarks (or just a dot if you don't want to enter any remark)
Note: If you entered a Marketplace URL, the item will be imported automagically, and there is no need to enter anything else: the title and the main image from the Marketplace item will be used, and the tags will be determined from the description of the item and the tags you're already using in your Wardrobe.
The following steps will only apply if you're using the manual mode (i.e., if you enter the title, tags, and remarks yourself). -
Take a snapshot in your viewer.
Click the "Snapshot" button in your viewer:
The Snapshot window will open. Select "Disk" and click "Save".
Note: You don't need to worry about the image's filename. The Wardrobe will associate the image automatically with the data you entered earlier.
Tip: Use the keyboard shortcut
Ctrl+`to save the snapshot to disk directly, bypassing the Snapshot window. -
Drag the image file with the snapshot you just created onto your Wardrobe web page.
Drop it onto the area where it says "Drop your snapshots here".
Click the "Import" button.
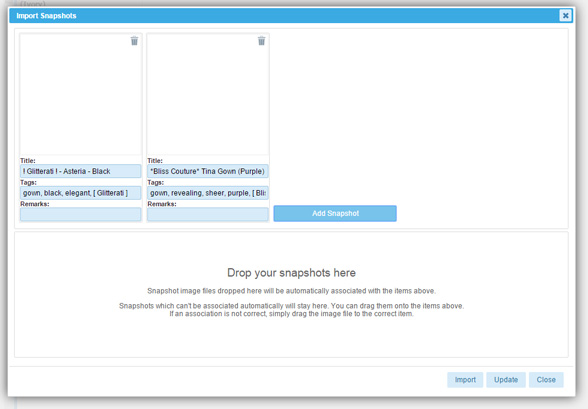
Tip: You don't have to drag the snapshot to the web page immediately after you created one. You can proceed and create multiple items by repeating the steps 1.-4. and then drag the new snapshots all at once onto your web page. They will be imported in a single go— a great way to save time and streamline your "Wardrobing" process!
If you want to see your newly submitted item, click the "Show All" button or click the clock in the search field, and then "Today".
Method III: Use the scanner
- Rez the box or bag of your recent purchase and move close to it.
- Click the scan button
 on your HUD. The Wardrobe system tries to find a matching item on the Marketplace and will add it to your Wardrobe.
If you want to see your newly added item, click "Refresh" on your Wardrobe web page and click the "Show All" button or click the clock in the search field, and then "Today".
Note: The title and the main image of the Marketplace item are used, and tags are determined automatically based on the description on the Marketplace page and the tagging system you're already using (if you already have items in your Wardrobe). You may of course edit the item if you don't like what was generated automatically.